|
Using the Gap-A-Matic 3000 |
||
| Proportion is an
important factor in any kind of fly, and it's nowhere more important
than in tying salmon flies. Of course this is a bit subjective - if you
study the classics you'll see that the proportions are all over the
place. More important than proportion, I believe, is consistency. If you
are making three Green Highlanders, they should all look identical when
you line them up.
In my view, there are really only two critical measurements in tying Classic Atlantic Salmon Flies - the tail and the body segments. The tail needs to be 1.5 times the gap of the hook. The body segments can be in halves, thirds, quarters, or combinations. So how do you get all that right? Well, you measure it. The way I do it is with a pair of dividers. For instance, with the tail I'll set my machinist's dividers to the proper distance, and then prepare the tail up against the dividers. I'll mount the tail, and then do a final check with dividers. No problem.If you get the tail right the wing length just falls into place. But how do you set the dividers? When I first started tying flies with my mentor, we measured. He was a woodworker, so we simply measured the hook gap with a small ruler, and multiplied by 1.5. It went something like this: "OK, we just lay our ruler up here, get a real precise measurement - looks like, let's say, 25/32" or so." "OK, what's that times 1.5? I get, ah, well, ah, I guess we'd have half of 25, or say 12, plus the 25 gives us 37/32. That's what, then, 1 and 5/32" right?" OK, so where's that on the scale, these are in 1/16" increments, right, and there's two sixteenths in a thirty-second - nope, I mean the other way around, and, ah, er, I think about 1 and 1/8 inch looks pretty good." Being the engineer, I just turned my ruler over, and said, "Well, it looks like 20 mm to me. What's 1.5 times 20 - 30 mm. No problem." Only, it seemed we just weren't going to convert to the metric system, at least not in these fly tying lessons.
|
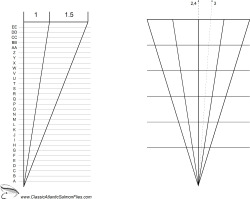
Figuring that both of these methods were a bit cumbersome, and having been on the Geometry Team in high school, I drew up a quick diagram. I knew that all I had to do was find where the hook gap matched the '1' gap, and then take my reading from the '1.5' gap. It worked great. Feeling flush with success, I made up a few that had the 1.5 multiplier on the front, and a way to divide the fly body into multiples on the back. I laminated it, and I use it all the time. Well, every time I change hooks or make a segmented body. To review, the steps are pretty simple. First, just hold the card up against the hook gap. Take note of the letter that best matches the gap. Now, set your dividers to the 1.5 section of that letter. Trim your tail to that length, and mount it. Now use your dividers to confirm that you've mounted it correctly. If you need a segmented body, say with three segments, just hold the dotted line with the 3 on it vertically, perpendicular to the hook shank. Slide the card up and down until the left and right angles correspond to where you want the body to begin and end. Mark the divisions with a marker. You're all set. All your flies will now look identical. (If you want to divide by halves or quarters, just use the 2,4 line as the center vertical.) Get your Gap-A-Matic here! Just download the .pdf file, or print it directly. Print another one on the back of the first sheet. Laminate. Cut in half. Give one to a friend. If you don't have any fly tying friends, just print one and fold it in half. :)
|
|